Volume Management - Chapter 12
Kubernetes uses Volumes of several types and few other forms of storage resources for container data management. In this chapter, we will learn about PersistentVolume and PersistenVolumeClaim objects, which helps us attach persistent storage Volumes to Pods.
- Explain the need for persistent data management.
- Compare Kubernetes Volume types.
- Discuss PersistentVolumes and PersistentVolumeClaims.
As we have learned, containers running in Pods are ephemeral in nature. All data is stored inside a container is deleted if the container crashes, meaning all data is lost since kubelet will restart the container in a clean state.
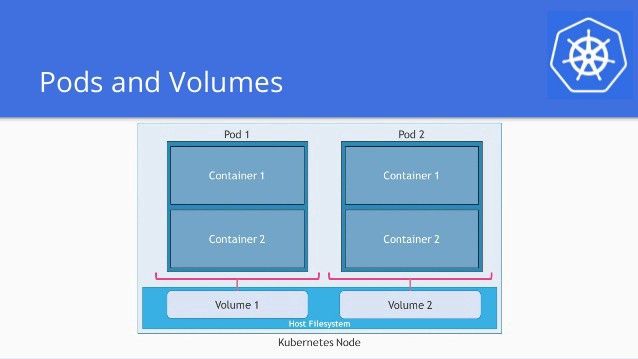
Kubernetes uses Volumes to overcome this problem. A Volume is essentially a mount point on the container's file system backed by a storage medium. The Volume is linked to a Pod and can be shared among the containers of that Pod. Although the Volume is deleted together with the Pod, it outlives the containers of the Pod, meaning the data is preserved across container restarts.
There are different Volume Types which are mounted inside a Pod. The Volume Type decides the properties of the directory, like size, content, default access modes, etc. The cloud providers like Azure, Google, Amazon and the OpenStack are providing their own Volume Types. We can find a full list of types here.
Given this many Volume Types, Kubernetes resolves this problem with the PersistentVolume subsystem, which provides APIs for users and administrators to manage and consume persistent storage. The PersistentVolume is a storage abstraction backed by several storage technologies, which could be local, network attached storage, cloud storage or a distributed storage solution. It is statically provisioned by the cluster administrator.
PersistentVolumes can be dynamically provisioned based on the StorageClass resource. Using PersistentVolumeClaims, a user sends the request for dynamic PersistentVolume creation, which get wired to the StorageClass resource.
The PersistentVolumeClaim is a request for storage by a user. The user requests resources based on type, access mode and size. There are three access modes: ReadWriteOnce, ReadOnlyMany an ReadWriteMany.

Each PVC contains a spec and status, which is the specification and status of the claim. The name of a PersistenVolumeClain object must be a valid DNS subdomain name.
Container Storage Interface (CSI)
Container orchestrators like Kubernetes, Mesos, Docker or Cloud Foundry used to have their own methods of managing external storage using Volumes. It was challenging to manage different Volume plugins for different orchestrators. The standardized Container Storage Interface is designed to work on different container orchestrators, they have developed the CSI specifications. CSI is in the stable support, which makes installing new CSI-compliant Volume plugins very easy.
Hands On
Inside the minikube VM create a new directory.
$ minikube ssh

$ mkdir pod-volume
$ cd pod-volume && pwd
/home/docker/pod-volume
$ exit
Let's create a share-pod.yaml
apiVersion: v1
kind: Pod
metadata:
    name: share-pod
    labels:
        app: share-pod
spec:
    volumes:
    - name: host-volume
      hostPath:
          path: /home/docker/pod-volume
    containers:
    - image: nginx
      name: nginx
      ports:
      - containerPort: 80
      volumeMounts:
      - mountPath: /usr/share/nginx/html
        name: host-volume
    - image: debian
      name: debian
      volumeMounts:
      - mountPath: /host-vol
        name: host-volume
      command: ["/bin/sh", "-c", "echo Introduction to Kubernetes > /host-vol/index.html; sleep 3600"]
The second debian image will overwrite the existing index.html file, since both containers share the same volume.
Create the object and verify the pods are running.
$ kubectl create -f share-pod.yaml
pod/share-pod created
$ kubectl get pods
NAME        READY   STATUS    RESTARTS   AGE
share-pod   2/2     Running   0          2m39s
We will expose the Pod through a NodePort type Service. And list the services and endpoints
$ kubectl expose pod share-pod --type=NodePort --port=80
service/share-pod exposed
$ kubectl get svc,ep
NAME                 TYPE        CLUSTER-IP     EXTERNAL-IP   PORT(S)        AGE
service/kubernetes   ClusterIP   10.96.0.1      <none>        443/TCP        12m
service/share-pod    NodePort    10.102.38.23   <none>        80:30116/TCP   61s

NAME                   ENDPOINTS             AGE
endpoints/kubernetes   172.17.104.205:8443   12m
endpoints/share-pod    172.18.0.3:80         61s
Now access the webserver by using either 172.17.104.205:30116 (kubernetes endpoint + share-pod port) or simply type minikube service share-pod.
This storage will outlive the pod as we would terminate it.
This is it for today friends, we have a short introduction into Volume management of Kubernetes. It is not as different as Volume management done in docker for example. I learned something new about the Container Storage Interface, which shows again that there is a lot of work going into standarising the container world. This is Great! We are in a early stage and much stuff is happening to make our lives easy and choose what we want or need to choose to manage our clusters.