Kubernetes Building Blocks - Chapter 8
We will explore the Kubernetes object model and discuss some of its fundamental building blocks. We will also discuss the essential role Labels and Selectors play in microservices driven architecture.
- Review the Kubernetes object model.
- Discuss Kubernetes building blocks, e.g. Pods, ReplicaSets, Deployments, Namespaces.
- Discuss Labels and Selectors.
Kubernetes Object Model
Kubernetes has a very rich object model, representing different persistent entities in the Kubernetes cluster. They describe what containerized applications we are running on which node, Application resource consumption, different policies attached to applications, like restart/upgrade policies, fault tolerance, etc.
The Kubernetes system manages the status section for objects, where it records the actual state of the object. At any given point in time, the Kubernetes Control Plane will try to match the object's actual state to the objects desired state, which we declared in our intent spec section. The spec section in any Deployment yaml describes the desired state, along with some basic information.
apiVersion: apps/v1
kind: Deployment
metadata:
  name: nginx-deployment
  labels:
    app: nginx
spec:
  replicas: 3
  selector:
    matchLabels:
      app: nginx
  template:
    metadata:
      labels:
        app: nginx
    spec:
      containers:
      - name: nginx
        image: nginx:1.15.11
        ports:
        - containerPort: 80
The apiVersion field specifies the API endpoint on the API server which we want to connect to.
The kind field specifies the object type, in our case it is Deployment, but it can also be Pod, Replicaset, Namespace, Service, etc.
The metadata field holds the object's basic information, such as name, labels, namespace, etc.
This example shows two spec fields (spec and spec.template.spec), the first one marks the beginning of the block defining the desired sate of the Deployment object. The Pods are created using the Pods Template defined in spec.template. In spec.template.spec, we define the desired state of the Pod.
apiVersion kind metadata and spec are all required fields for a Kubernetes Deployment.
Once the Deployment object is created, the Kubernetes system attaches the status field to the object.
Pods
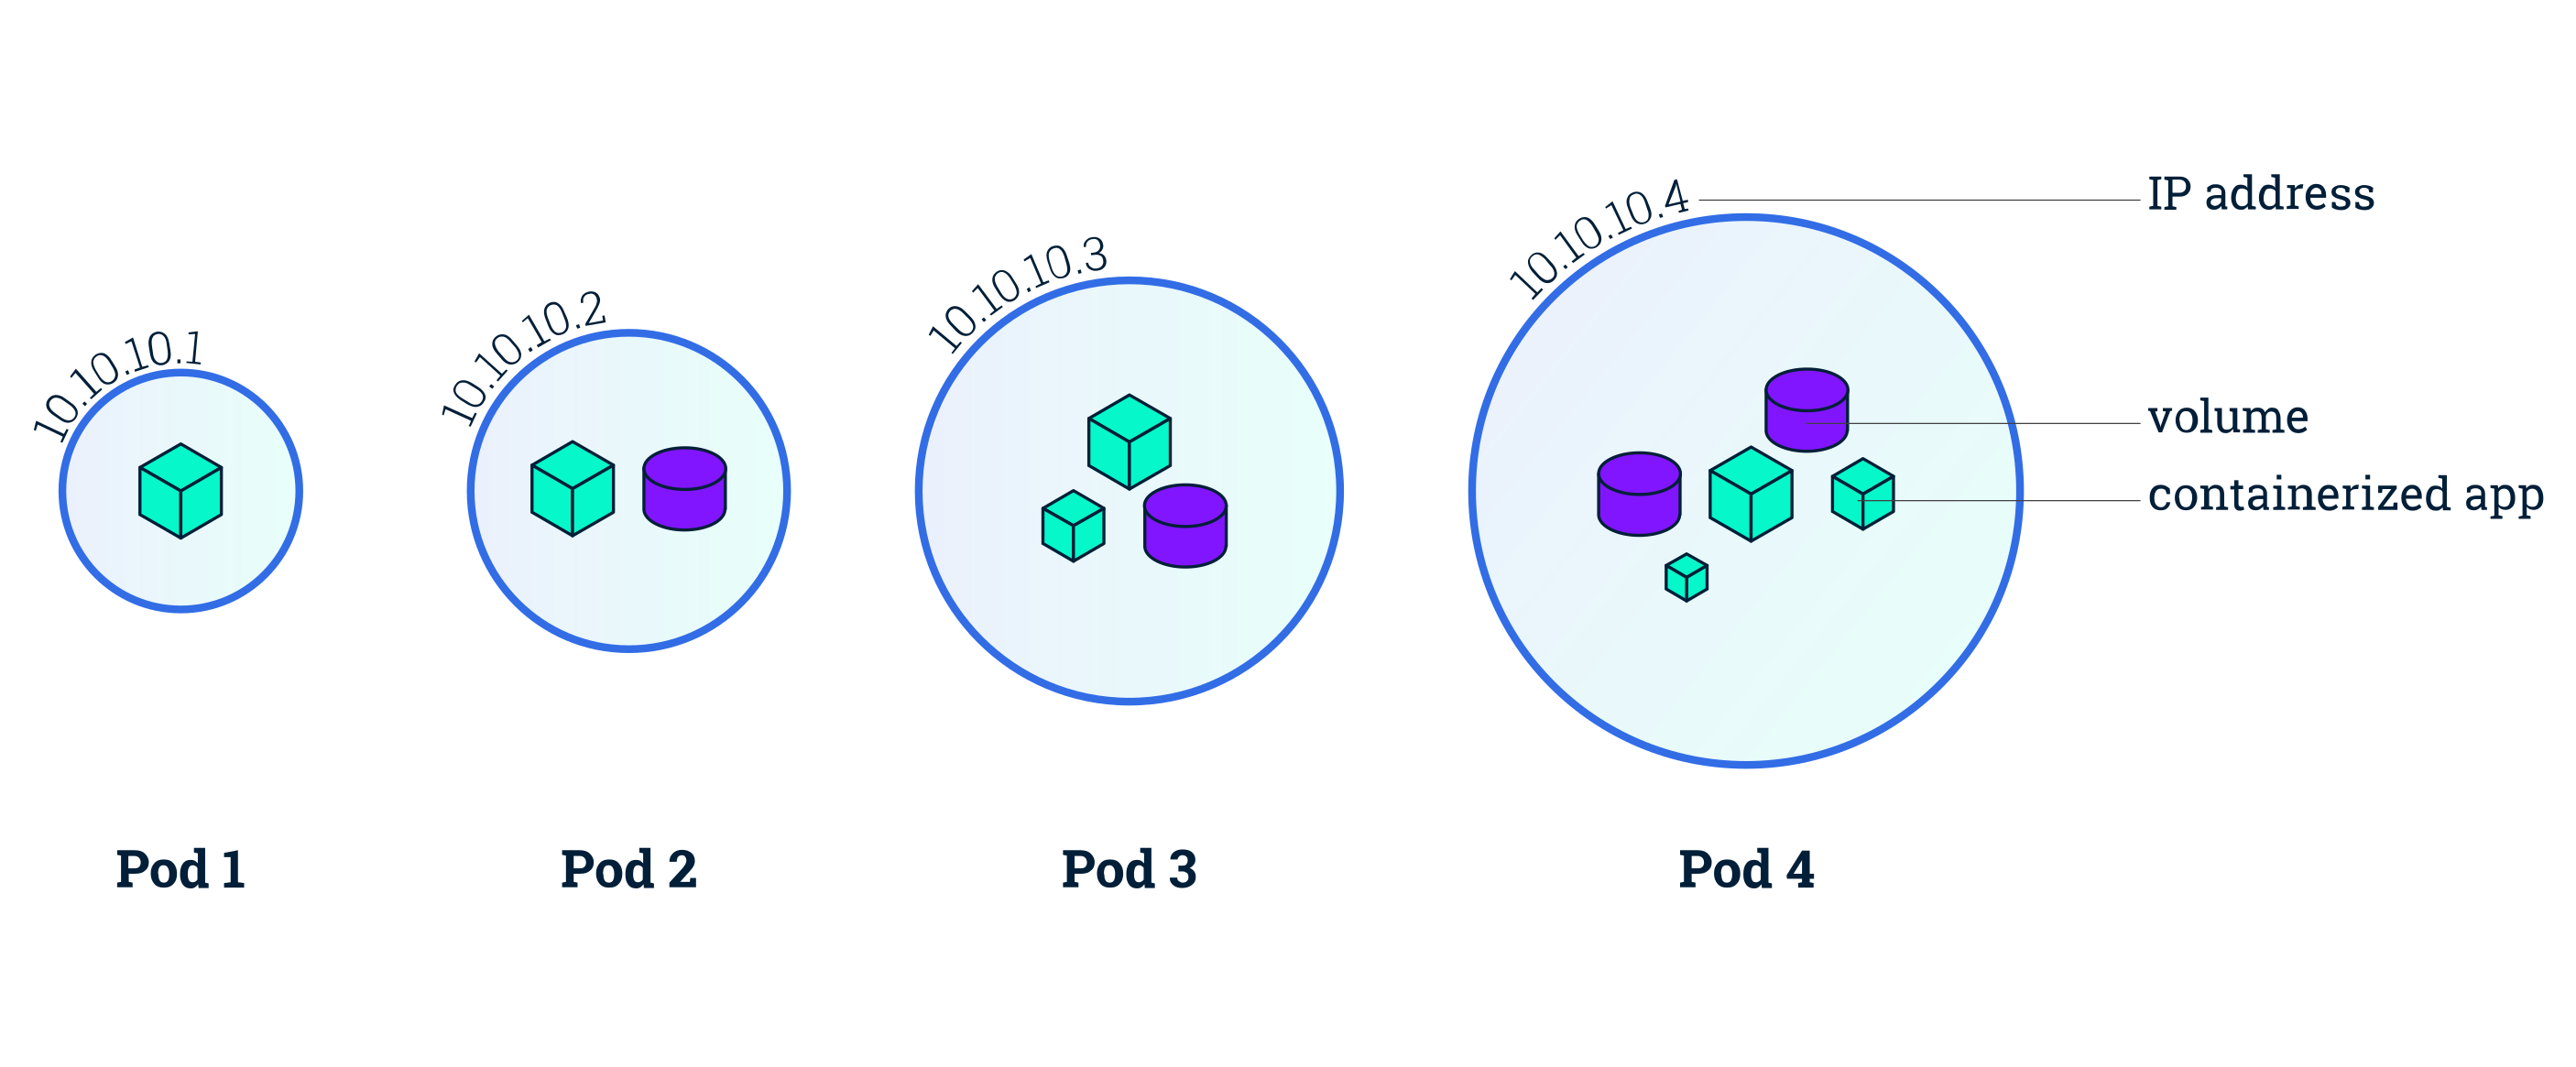
We get (again) an explanation of what Pod's are, I hope I am not the only one confused. A Pod is the smallest and simplest Kubernetes object. It is a logical collection of one or more containers, which are scheduled together on the same host with the Pod, they share the same network namespace and have access to mount the same external storage (volumes). As we can see above, we attach a nested Pod's specification (spec.template.spec) to a controller object using the Pod Template, but we can also deploy a Pod by itself.
This is an example of a Pod's objects configuration.
apiVersion: v1
kind: Pod
metadata:
  name: nginx-pod
  labels:
    app: nginx
spec:
  containers:
  - name: nginx
    image: nginx:1.15.11
    ports:
    - containerPort: 80
Required fields are the apiVersion field, which must specify v1 for the Pod object definition.
The kind field which is specifying the Pod object type.
The metadata field, holds the object's name and label.
And the spec field, which is defining the desired state of the Pod object - also named the PodSpec.
Labels and Selectors
Labels are key-value pairs attached to Kubernetes objects. They are used to organize and select, based on the requirements, subsets of objects. Controllers use Labels to logically group together decoupled objects.
Controllers use Label Selectors to select subsets of objects. Two types of Selectors are supported by Kubernetes.
Equality-Based Selectors allow filtering of objects based on Label keys and values. Matching is achieved using the =, == (equals, used interchangeably), or != (not equals) operators. For example, with env==dev or env=dev we are selecting the objects where the env Label key is set to value dev.
Set-Based Selectors allow filtering of objects based on a set of values. We can use in/notin operators for Label values, and exist/does not exist operators for Label keys. For example, with env in (dev,qa) we are selecting objects where the env Label is set to either dev or qa; with !app we select objects with no Label key app.
Replication Controllers
A Replication Controller ensures that a specified number of replicas of a Pod are running at any time, by constantly comparing the actual to the desired state. Most quick Tutorials are giving this feature as a main advantage of Kubernetes. It will terminate any random Pod exceeding the desired count or will request additional Pods to match the given configuration.
ReplicationController are no longer the recommended way to spin up a replication and it is recommended to use the Deployment controller which then configures a ReplicaSet controller to manage Pods' lifecycle.
Replica-Sets
A ReplicaSet Controller is, in part, the next-generation ReplicationController. The difference is that ReplicaSets support both equality- and set-based Selectors, whereas ReplicationControllers only support equality-based Selectors.
Given the example configuration
apiVersion: apps/v1
kind: ReplicaSet
metadata:
  name: frontend
  labels:
    app: guestbook
    tier: frontend
spec:
  # modify replicas according to your case
  replicas: 3
  selector:
    matchLabels:
      tier: frontend
  template:
    metadata:
      labels:
        tier: frontend
    spec:
      containers:
      - name: php-redis
        image: gcr.io/google_samples/gb-frontend:v3
We can inspect all ReplicaSets with kubectl get rs and for a more detailed view we will kubectl describe rs/frontend which should print an output similar to.
Name:         frontend
Namespace:    default
Selector:     tier=frontend
Labels:       app=guestbook
              tier=frontend
Annotations:  kubectl.kubernetes.io/last-applied-configuration:
                {"apiVersion":"apps/v1","kind":"ReplicaSet","metadata":{"annotations":{},"labels":{"app":"guestbook","tier":"frontend"},"name":"frontend",...
Replicas:     3 current / 3 desired
Pods Status:  3 Running / 0 Waiting / 0 Succeeded / 0 Failed
Pod Template:
  Labels:  tier=frontend
  Containers:
   php-redis:
    Image:        gcr.io/google_samples/gb-frontend:v3
    Port:         <none>
    Host Port:    <none>
    Environment:  <none>
    Mounts:       <none>
  Volumes:        <none>
Events:
  Type    Reason            Age   From                   Message
  ----    ------            ----  ----                   -------
  Normal  SuccessfulCreate  117s  replicaset-controller  Created pod: frontend-wtsmm
  Normal  SuccessfulCreate  116s  replicaset-controller  Created pod: frontend-b2zdv
  Normal  SuccessfulCreate  116s  replicaset-controller  Created pod: frontend-vcmts
Kubernetes will then bring the Pods state to the desired number of replicas(in this case 3 replicas) if one Pod might unexpectedly terminate (due to insufficient resources, timeout, etc.).
ReplicaSets can be used independently as Pod controllers while only offering a limited set of features. The recommended controllers for the orchestration of Pods are Deployments, which will automatically create a ReplicaSet, which will then create a Pod. There is no need to manage ReplicaSets and Pods separately, the Deployment objects will manage them on our behalf.
Deployments
The DeploymentController is part of the master node's controller manager, and as a controller it also ensures that the current state always matches the desired state. It allows for seamless application updates and rollbacks through rollouts and rollbacks.
Given a current state of a ReplicaSet A with version 1, we want to update the application to a new version. The Deployment will trigger a new ReplicaSet B with version 2. The seamless transition between the two ReplicaSets from ReplicaSet A v1 to ReplicaSetB v2, with each having 3 Pods defined, is called a Deployment rolling update.
A rolling update is triggered when we update the container image, container port, volumes and mounts and it will create a new Revision. While other operations like scaling or labeling will not trigger a rolling update, thus do not change the Revision number.
Once the rolling update has completed the Deployment will show both ReplicaSets A and B, where A is scaled to zero Pods and B is scaled to three Pods. This is how the Deployment records its prior state configuration settings as Revisions.
The training gives us a good diagram to visualize it.
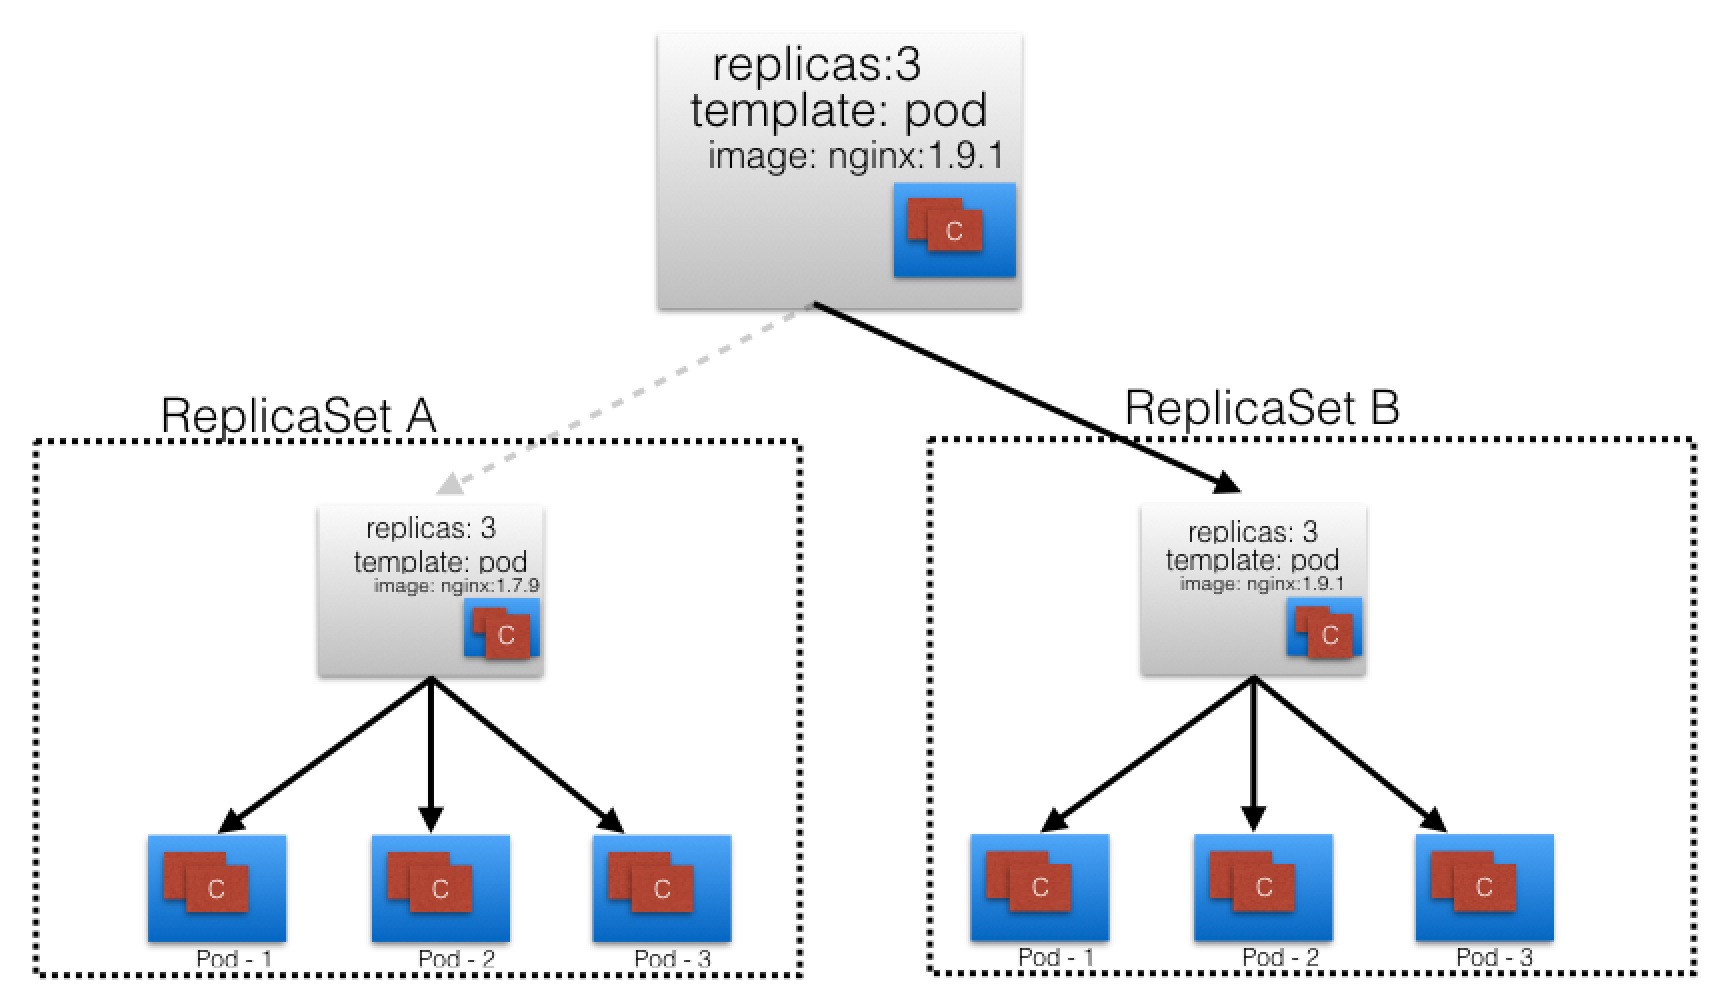
The Key part for a rollback is that the Revision of ReplicaSet A is kept, thus allowing the Deployment to return to a prior known configuration state and seamlessly return to the state of v1.
Namespaces
Namespaces are intended for use in environments with many users spread across multiple teams, or projects. They provide a scope for names, because names of resources need to be unique within a namespace, but not across namespaces.
Generally, Kubernetes creates four namespaces out of the box: kube-system, kube-public, kube-node-lease and default.
kube-system contains objects created by the Kubernetes system.
The default namespace contains objects and resources created by administrators and developers.
kube-public is an unsecured and readable by anyone namespace, which exposes public (non-sensitive) information about the cluster.
kube-node-lease holds node lease objects used for node heartbeat data.
However, good practice is to create additional namespaces, as desired, to virtualize the cluster and isolate users, developer teams, applications or tiers.
Resource Quotas help users limit the overall resources consumed within Namespaces, while LimitRanges help limit the resources consumed by Pods or Containers in a Namespace.
Hands On
Create deployment named 'mynginx' with image nginx:1.15-alpine image.
kubectl create deployment mynginx --image=nginx:1.15-alpine
List deploymets, replicasets and pods with the label app=mynginx.
kubectl get deploy,rs,po -l app=mynginx
Scale deployment mynginx to 3 replicas.
kubectl scale deploy mynginx --replicas=3
See and remember the 'replicaset.apps/mynginx-' hash.
Show details of deployment mynginx.
kubectl describe deploy mynginx
Observe PodTemplate.Containers.nginx.Image.
Show revision.
kubectl rollout history deploy mynginx
Set image to nginx:1.16-alpine.
kubectl set image deployment mynginx nginx=nginx:1.16-alpine
Show revisons of deployment, here you should have 2 revisions.
kubectl rollout history deploy mynginx
List deployment, replicaset and pods. You can see here that revision 1 has been scaled down to 0. It is the one with the hash you remembered.
kubectl get deploy,rs,po -l app=mynginx
See that the PodTemplate.Containers.nginx.Image.
has been changed to nginx:1.16-alpine.
kubectl rollout history deploy mynginx --revision=2
Rollback to revision 1.
kubectl rollout undo deployment mynginx --to-revision=1
Show history.
kubectl rollout history deploy mynginx
Revision 1 has been removed and is now revision 3.
See that the PodTemplate.Containers.nginx.Image value is nginx:1.15-alpine again.
kubectl rollout history deploy mynginx --revision=3
List deployment replicaset and pods. You can see that version 1.16-alpine has been scaled down to 0 and 1.15-alpine has been scaled back up to 3.
kubectl get deploy,rs,po -l app=mynginx
The replicaSet hash value is the same as you remembered.
All Information here is from this one training and official documentation, I have copied some of it and do not own it. I am just documenting my learning path.
Thanks for reading folks, stay healthy.