Authentication, Authorization, Admission Control - Chapter 9
Every API request reaching the API server has to go through several control stages before being accepted. We are going to learn about Authentication, Authorization and Admission Control stages of the API access control.
- Discuss the authentication, authorization, and access control stages of the Kubernetes API access.
- Understand the different kinds of Kubernetes users.
- Explore the different modules for authentication and authorization.
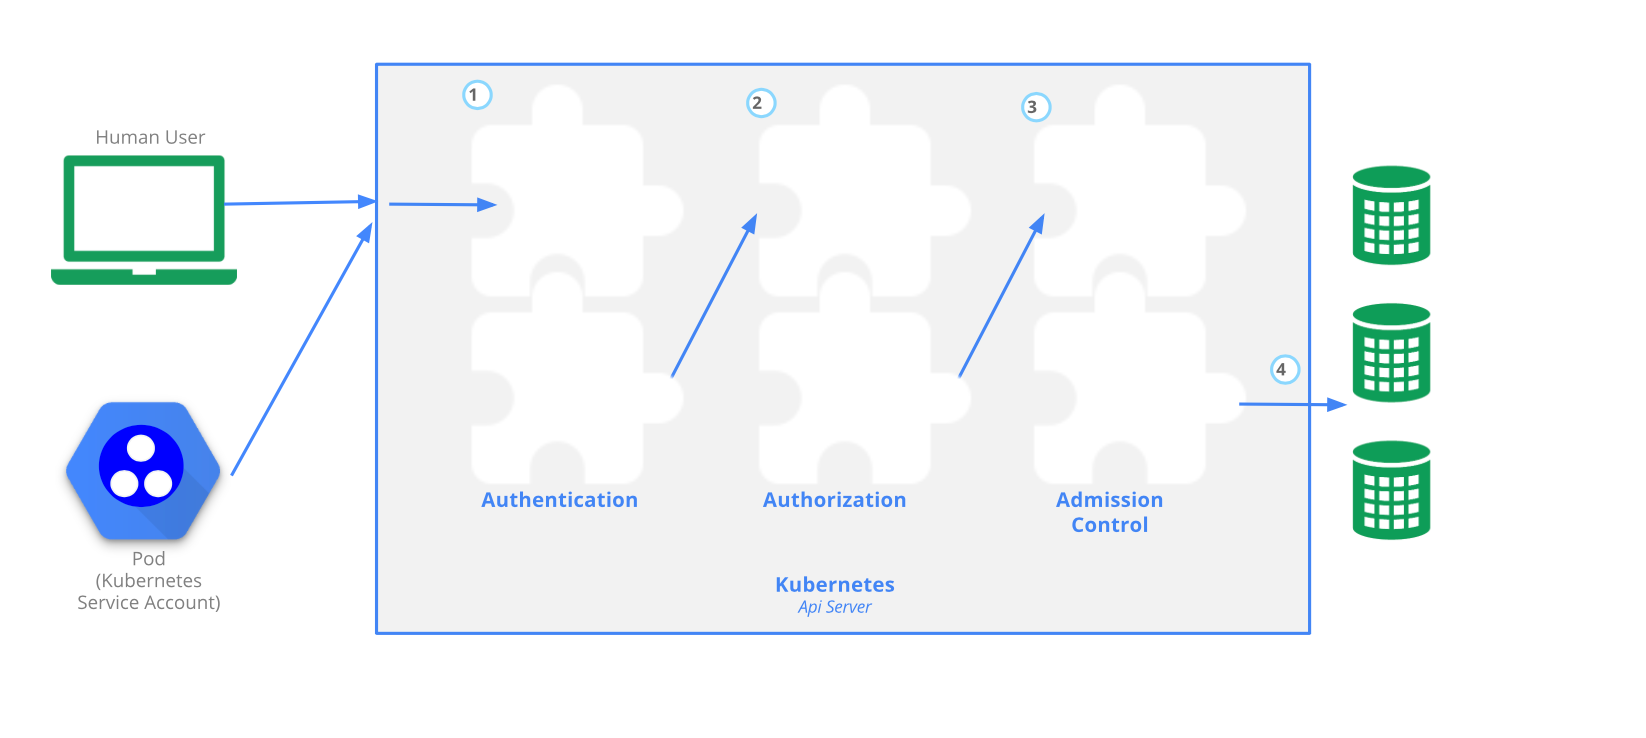
Each access request goes through an Authentication, which logs in the user. An Authorization, which authorizes the API request submitted by the authenticated user and an Admission Control which will validate and/or modify user requests. The Intro image visualizes these steps.
Authentication
Kubernetes does not have an object called user, nor does it store usernames or other related details in its object store. However, even without that, Kubernetes can use usernames for the Authentication phase of the API access control, and to request logging as well.
There are two kinds of users.
Normal Users
They are managed outside of the Kubernetes cluster via independent services like User/Client Certificates, a file listing usernames/passwords, Google accounts, etc.
Service Accounts
Service Accounts allow in-cluster processes to communicate with the API server to perform various operations. Most of the Service Accounts are created automatically via the API server, but they can also be created manually. The Service Accounts are tied to a particular Namespace and mount the respective credentials to communicate with the API server as Secrets.
If properly configures, Kubernetes can handle Anonymous request, which are given a username of system:anonymous and a group of system:unauthenticated. In version 1.6+, anonymous access is enabled by default if an authorization mode other than than AlwaysAllows is used, and can be disabled by passing the --anonymous-aut=false option to the API Server.
There is also an option to use User impersonation, which allows to act as another user, helpful to troubleshoot authorization policies.
For authentication, Kubernetes uses a series of authentication modules, we can enable multiple authenticators and the first module to successfully authenticate the request shot-circuits the evaluation. At least two methods should be enabled to ensure a successful user authentication: tokens authenticator and one of the user authenticators. You can read about the modules in the Authentication Strategies section.
Authorization
After a successful authentication, users can send API requests to perform different operations. Kubernetes is using various authorization modules, that allow or deny the requests. Kubernetes authorizes API requests using the API server. It will evaluate all request attributes against all policies and allows or denies the request, in order to proceed is must be allowed by some policy. This means that permissions are denied by default. These attributes include user, group, extra, Resource, namespace or API group, to name a few.
When multiple authorization modules are configured, each is checked in sequence.
Authorization modes
- Node authorization
- Attribute-based access control (ABAC)
- Webhook mode
- Role-Based access control (RBAC)
Admission Control
Admission Controllers are used to specify granular access control policies, which include allowing privileged containers. We force these policies using different admission controllers.
Dynamic Admission Control plugins are developed as extensions and run as admission web-hooks.
Hands On
Authentication and Authorization Demo Guide
Prerequisites:
- Minikube v1.13.1
- Kubernetes v1.19.2
- Docker 19.03.12-ce
start minikube
$ minikube start
View the content of kubectl clients's configuration manifest, and observing the context minikube.
$ kubectl config view
Create lfs158 namespace.
$ kubectl create namespace lfs158
Create a private key with openssl.
$ openssl genrsa -out student.key 2048
Then create a certifacte signing requst for the student user.
$ openssl req -new -key student.key -out student.csr -subj "/CN=student/O=learner"
Create a YAML manifest and save it with a blank value for the request field.
apiVersion: certificates.k8s.io/v1
kind: CertificateSigningRequest
metadata:
  name: student-csr
spec:
  groups:
  - system:authenticated
  request: <assign encoded value from next cat command>
  signerName: kubernetes.io/kube-apiserver-client
  usages:
  - digital signature
  - key encipherment
  - client auth
View and encode the certificate in base64 and assign it to the request field. (I used wsl since I am on Windows, since unix keeps it simple)
$ cat student.csr | base64 | tr -d '\n'

# I am using wsl on windows to keep it simple.
Put the result into the request field value.
Create the certificate signing request object, and list the certificate signing request object.
$ kubectl create -f signing-request.yaml
certificatesigningrequest.certificates.k8s.io/student-csr created

$ kubectl get csr
You will see the PENDING condition.
Approve the certificate signing request object, then list the certificate singing request object again.
$ kubectl certificate approve student-csr
certificatesigningrequest.certificates.k8s.io/student-csr approved

$ kubectl get csr
It is now in a Approved,Issued condition.
Extract the approved certificate from the certificate signing request, decode it with base 64 and save it as a certificate file. And view it again.
$ kubectl get csr student-csr -o jsonpath='{.status.certificate}' | base64 --decode > student.crt

# for windows I did
$ kubectl get csr student-csr -o jsonpath='{.status.certificate}' > temp
$ wsl
$ cat temp | base64 -d > student.crt
$ exit
Configure the kubectl client's configuration manifest with the student user's credentials by assigning the key and certificate.
$ kubectl config set-credentials student --client-certificate=student.crt --client-key=student.key
User "student" set.
Create a new context entry in kubectl client's configuration manifest for the student user, associated with the lfs158 namespace within the minikube cluster.
$ kubectl config set-context student-context --cluster=minikube --namespace=lfs158 --user=student
Context "student-context" created.
View the contents of the kubectl client's configuration manifest again, observing the new context entry student-context. There should be a new user entry student.
$ kubectl config view
While in default minikube context, create a new deployment in the lfs158 namespace.
$ kubectl -n lfs158 create deployment nginx --image=nginx:alpine
deployment.apps/nginx created
From the new context student-context try to list pods.
$ kubectl --context=student-context get pods
Error from server (Forbidden): pods is forbidden: User "student" cannot list resource "pods" in API group "" in the namespace "lfs158"
We will now assign a limited set of permissions to the student user in the student-context.
Create a YAML configuration manifest for a pod-reader Role object, which will only allow get, watch, list actions in the lfs158 namespace against pod objects. And list it from the minikube context but from the lfs158 namespace.
$ kubectl create -f role.yaml

$ kubectl -n lfs158 get roles
We will create another YAML configuration manifest for a rolebinding object, which will assign the permissions of the pod-reader Role to the student user.
Then we will create the rolebinding object and list it from the minikube context, but from the lfs158 namespace.
$ kubectl create -f rolebinding.yaml

$ kubectl -n lfs158 get rolebindings
Now that we have assigned the permissions, we can successfully list pods from the new student-context.
$ kubectl --context=student-context get pods
This Guide is almost the same as you can find it on edx.org. All credits go to them.
That's it for Chapter 9. See you in Chapter 10. Thanks for reading.